PERSONALIZE YOUR COMPUTER
Part III: ADDING TO YOUR COMPUTERThere are three ways that you can add pictures, desktops, screen savers, etc. to your computer.
You can copy them from a disc or CD or you can download from the internet or you can create your own.
Once you get new files, where do you put them? That's the first topic of this chapter.
For this discussion, assume that:
Picture files end in .bmp
Sound files end in .wav
Music files end in .mid
Screen Saver files end in .scr(There are a lot more extensions used for all kinds of files. Pictures can also be .gif, .jpg, .psp, .msp, .mac and more depending on what program was used to create the picture. The same is true for audio files. The files we are interested in right now, however, are .bmp, .wav, .mid, and .scr)
Where programs live depends on your operating system and who set up your computer. If you have Windows 98*, your files will possibly be in the same places that mine are. Any other Operating System will have different storage areas for files. I can only describe my own computer. You might look in the places I describe to see if the files types are located there or you may have to do a SEARCH.
In my computer:
Files Live In: Path .bmp C:\Windows (Drive C, Folder named "Windows") .mid and .wav (sound and music files) C:\Windows\Media (Drive C, Folder named "Windows", Subfolder named "Media") .scr (Screen Saver) C:\Windows\System (Drive C, Folder named "Windows", Subfolder named "System"). To search for your files:
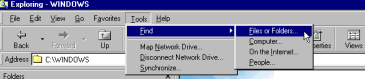
Go to Windows Explorer and click on TOOLS\Find\Files or Folders. (or press F3)
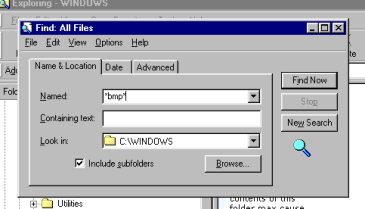
You will get this window:
Where is says "NAMED": type in *.bmp*
The *.* tells the computer to look for all files which end in .bmp.
Limit your search to Drive C.
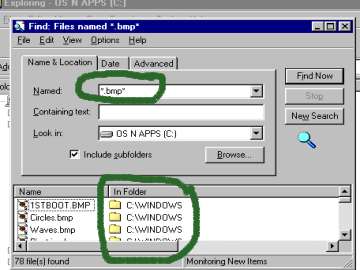
You will see the names of some .bmp files and the name of the folder in which they live.
Repeating the process, do a search for
- *.mid*
- and *.wav*
- and *.scr* files.
Now that you know where the files you already have reside, you can add new files to their appropriate "homes".
In order to get new files:
A. FROM A DISC or CD
To store them on your computer, you'll need to know two things. Where are the pictures now? Where do I want them to be?
We just answered the second question. But how do you tell your computer to go get the pictures from this CD?
As with almost everything else with computers, there are a couple of ways to do this. In both methods you need first of all to select the file you want to move and then select the location you want to move it to (the target):
Point and Drag:
- Find the picture Go to Windows Explorer.
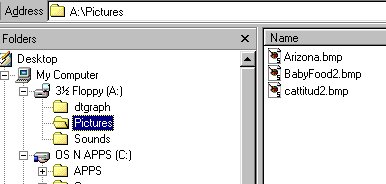
You'll see a list of drives and folders on the left-hand side of your screen.Sorry, this project was written to be put on a CD, not to be read over the internet. You can find the pictures I had intended you to find on the CD by using this link. Then use your back button to return here.
Arizona
Baby Food
CatSelect the drive which contains this CD. It will have this icon:
Open the folder named "Pictures" by double-clicking on its name. On the right side of your screen you will see the names of the pictures we have included.
(Don't worry that in the above picture the folder "Pictures" is shown as being in Drive A. That's where they were when this lesson was being written. They are now in your CD drive.)
Highlight one of them by clicking your left mouse button over the name.
- Find the target folder
Now scroll down the left hand side of the screen until you find C:\WINDOWS (or the name of the folder in which your .bmp files live).
- Copy the picture into the target folder.
Put your mouse pointer on the name of the file you want to move, ie, in the list on the right side of your screen. Click and hold down your left mouse button.and also hold down the CTRL key. Move your mouse towards the left and the file name will come with you. As you get close to your target file you will see the names of the folders on the left side become highlighted. Move your mouse (continuing to hold down the left button) until the target folder is highlighted. Then release the mouse button and the CTRL key. This will copy the file into your computer.
(I have found that holding down the CTRL key when moving a file or folder is a good habit. It actually creates a copy of the file and moves it at the same time. If you do not hold down the CTRL button and you are moving a file from one place to another on the same disk, it will be moved rather than copied and will no longer be in its original location. If you don't want it in both places you can copy it to its new location, verify that it is there, and then delete it from its old location.....a few more steps but safer for novice computer users.)
Now you can go to the Display Properties Dialog Box and hopefully, there it is in the list with everybody else!
Copy and Paste
- Highlight the file that you want to copy
- Go to the Edit option on your menu bar and select Copy.
- Go to your target folder
- Go to the Edit option and select Paste
You can follow the same procedure with the sounds that are included in this CD.
- Go to the drive where the file is that you want to copy.
- Highlight the file.
- Find the area where you want the file to go.
- Holding down the CTRL key, drag the file from where it is to where you want it to be, or use the copy and paste method.
To get pictures from the internet is really easy.
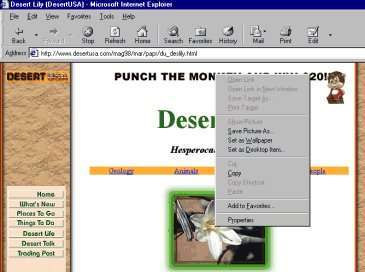
Find a picture you like and RIGHT click on it.
I chose a picture of a desert lily from www.DESERT USA.com.
(Used with permission.)A box will open asking if you want to save this picture as a picture, as desktop, or as wallpaper.
For demonstration purposes, I clicked "Save Picture as" and a window opened up allowing me to browse my computer and decide where to put this picture. I chose to put in in WINDOWS in order to use it as a wallpaper selection.
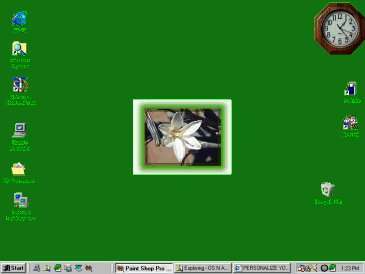
Note that I also saved it as a .bmp file.
I then opened my Display properties dialog box and followed the steps as outlined in Part 1 and this is the result:
You can right click on any picture or banner or background and follow the steps outlined above in order to capture from the internet.
Please be aware that Graphics on the Internet are protected by the same copyright laws as other material. They can be copied for your own personal use but are not to be sold without permission.
I. Paint
Windows 98* includes a Graphics Program called "Paint".In previous versions of Windows it was called "Paintbrush". You'll find it in your Start Menu under Programs/Accessories. Or you can search for it in Windows Explorer/Tools/Find File.
Paint has its own Help file with complete instructions in its use. You can create your own graphics designs and/or edit other pictures, ie, resizing, changing the colors, adding text, etc.
There are many graphic arts programs on the market. The one most commonly used (and the one I used to create this diskette) is Paint Shop Pro® from JASC Software.
Clip Art is usually provided in any program such as "Make your Own Greeting Cards" or "Make your own CD labels". Save a ClipArt picture as a .bmp file and use it on your desktop.
II. Other Input devices (Scanners, Digital Cameras)
You can scan in pictures and you can download pictures from your digital camera. Read the instructions that came with your scanner or camera.
There are other ways to personalize your computer by changing its settings. Let's take a look.
Please click here to return to the table of contents, then go to Part IV: Changing your computer settings.
*Windows* refers to Microsoft Windows 95® or Microsoft Windows 98®.


