Lesson 6 - Windows Explorer
In Lesson #4's practice session, you saw how to do a search from the Start Menu. It's time you learned a bit more about what's available on your computer.
We will begin with Windows Explorer. This is a huge topic because Windows Explorer is a table of contents for your computer, a file manager, and a tool for you to use for a variety of things.
First of all, what is Windows Explorer?
Part I: Introduction:
Windows Explorer has many uses.
You can use it to see the file structure on your computer, to find files and folders, to save files and move them and organize them, to create folders and shortcuts. It is a tool for viewing and it is a file manager.
Operating System and hard drives
Where are your programs? Why, mostly they are on Drive C, of course. To the beginner, that really isn't very helpful.
Well, Drive C is your hard-drive and home to your operating system.
So, what does that mean?
In order for your computer to do anything, it must have an operating system. That means that when you turn your computer on, electrons flow and stuff happens. What happens first is controlled by the BIOS chip on your mainboard. It tells your operating system to wake up and get going! It is your operating system that determines what you will see on your screen, what help screens are available, how you access files.
Windows* lives on Drive C. Every computer has a hard drive. It is a piece of hardware which lives in the BIG BOX and provides a place for permanent storage of programs.
You also have Drive A which is your 3 1/2" drive. You can store programs and/or information on Drive A on a diskette. The diskette is portable....you can take it to another computer of the same type and use it. You can also use diskettes to back-up all of your programs and your work. You probably also have a CD-ROM drive. Do you know its name? It might be Drive B or D, etc. Mine is Drive G. We'll figure out what yours is named in this lesson.
So..What Is Windows Explorer?
Part of your Windows* operating system includes Microsoft Windows Explorer.
Explorer is like a table of contents to your computer. You can look at Explorer and find out what you have and where.
Explorer is a tool. From Explorer you can create shortcuts, access Windows Help, search for files and more. It is also a file manager. From Windows Explorer you can create folders, move and/or copy files, delete files, organize your files.
Why do I need to know about Windows Explorer?
Almost everything that you do with your computer can be done in several ways. Some of the things you want to do are most easily accomplished in Windows Explorer. For example, if you want to create a folder or move a program or delete a program. Anything you want to do that would come under the heading of file management can be done from Windows Explorer. You can search your computer and find a file or a picture or program. Windows Explorer has a help screen so if there's anything you want to know more about or if you get stuck on some task, the Help screen in Explorer has all the information about Windows* to help you.
Can you imagine a filing cabinet in which nothing is every thrown away? (You could if you lived in my house!) If it is a large cabinet, it will be fine for awhile but eventually it will be so crammed with papers and folders that its purpose of being able to locate information will be defeated. And you won't be able to add anything new because all the space is used up. You need to be able to organize and control your space.
Part II: File Management
Understanding File Structure.
Files are usually kept in folders. A program can be a file or a collection of files in a folder. When your computer was set up, folders were organized into a system much as you would do if you had to put a bunch of folders into a filing cabinet....you need some method of organization if you ever hope to find anything again. In your computer you need to be able to find the filing cabinet first, then the right drawer, then the right folder, and then the file.
Programs come in four basic types:
Applications, Utilities, Games, and (other)Programs.
- An application program could be a word processor, a spreadsheet, a money manager, a graphics developer.... in other words, a program where you input data to create something.
- A utilities program could be a virus scanner, a disk defragmenter, something you use in the maintenance of your computer.
- Games is self-explanatory.
- Programs include everything else including the tools you use accessing the internet.
Those are some basic divisions of types of programs and each type should have its own folder. Your computer will have more folders than those but we're just trying to get an idea here of where your files might be kept.
Thus far we have:
Drive C:
+Applications
Word processing
Spreadsheet
Money manager
Graphics developer
Games
Solitaire
+Programs
Internet Explorer
Outlook Express
+Utilities
Virus scanner
Scan disk
Disk DefragmenterYou will also have at least Recycle Bin, My Documents, and Windows folders, all of which will be on your harddrive. You will have more but these are basic.
Also, I've added small plus (+) signs next to some of the folder names. That indicates that, inside the folder you are viewing, there are other folders. For example, inside Applications there is a folder named Word processing, another folder named spreadsheet, etc. There is no plus sign in front of Games because Solitaire is a file, not a folder. So the plus sign means "I am a super folder. I have sub-folders." The super folder is sometimes called the root directory.
How to I get to Windows Explorer?
Let's go look at your computer.
There are several ways to find Windows Explorer. You can go to the Start Button and choose Programs, and then click on Windows Explorer; Windows 98* users can right click on the Start button and then choose "Explore".or click on My Computer icon and select Explore; Or perhaps you have an icon on your desktop which looks like a folder with a magnifying glass on top of it. It looks like this:

You can click on the icon.
If you don't find Windows Explorer in any of those places, click on your Start Button, select Find/Files and Folders and type in Windows Explorer. In the space which says Find In, click on the small button on the right side and choose Drive C. Then click on the Find Now button.
Find the file which has the Windows Explorer icon on the left side. See, mine is in C:\Windows. (Drive C, in a folder named Windows). Double-click on the icon and Windows Explorer program will open.
Before we begin to discuss what you see in Windows Explorer, we need to arrange the windows so that you can see both your own computer's Windows Explorer and what I have written here. For that, let's go to a practice area. Please click here.
Part III: Exploring Windows Explorer?
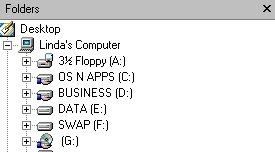
Let's just look at the left side of your Windows Explorer first:
From this picture you can see that my computer has a 3 1/2" floppy (drive A), a hard-drive named OS N APPS (drive C), three other hard-drives named Business (drive D), Data (drive E), and Swap (drive F), and a CD-Rom (drive G). (Drives D, E, and F are actually one drive which has been partitioned, but that's way beyond this discussion.)
Now look at your Internet Explorer. Can you find the name of your CD-ROM? Remember it 'cause we'll use it later!
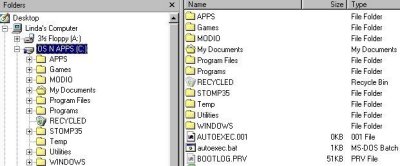
Now go to Drive C's name and click on the plus sign. The Folder named Drive C will open revealing the folders and files inside of Drive C. If you double-click on the name of Drive C, the contents of Drive C will also appear on the right side of your screen.
(If your Windows Explorer looks different than mine, go to View and select Details).
For now, just click on the plus sign for Program Files. That should give you a clearer picture of the structure of your files.
Note also that if you open a folder using a plus sign, it then becomes a minus (-) sign. You can click on the minus sign to close the folder.
To better explain the difference between what you see on the left side of this screen and what you see on the right side, here is an example from my computer:
The word processing program that I use is Word for Windows. (You may also have Word for Windows on your computer and if you do it is on Drive C and probably in the Applications folder somewhere but, again, it depends on the person who set up Windows* on your computer.)
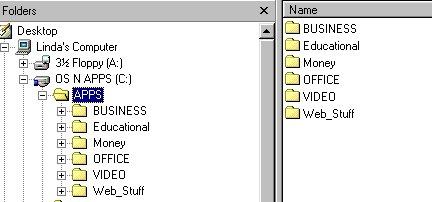
My program is found on Drive C, in the APPS folder, in a subfolder called BUSINESS and yet another folder called WINWORD, so the hierarchy looks like this:
Drive C:
+Applications
+Business
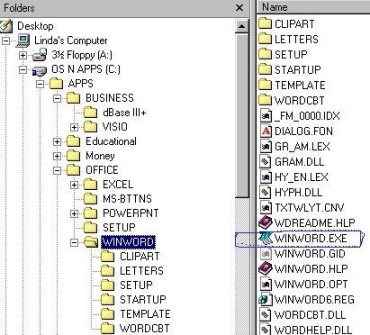
+WinwordNotice that Winword also has a plus sign in front of it. If I click on that plus sign, I will see other folders named:
ClipArt,
Letters,
SetUp,
StartUp,
Template, and
Wordcbt.If I want to open and use the Winword program, where would I go from here? Well, common sense says to go to StartUp. Opening the folder Start Up I find two files, neither of which will open the program.
But if I double-click on the word "Winword", the contents of this folder appear on the right hand side of the screen and I see that I have the above mentioned 6 folders but I also have a number of files which are not in subfolders. They are just in the folder Winword. (This is called the root directory....it is a super-folder.) And one of the files is Winword.exe and that is the file which will start the program.
How did I know that? That's a whole 'nother lesson but the ending of that file, the dot exe (.exe)means that that file is EXEcutable and will start a program.
So what you see on the left side of your screen are folders, what you can see on the right side are folders and files.
Do I go through all of that every time I want to use WinWord? No, I have a shortcut on my desktop. I'll show you how to make shortcuts in just a minute and how to search your computer to see if you have Word for Window.
Anyway, that gives you some idea of the way Windows Explorer is structured. Your drives are listed. Inside each drive are a number of folders. Inside each folder are more folders and files. You can see the drives and the folders on the left side of your screen and the folders and files on the right side of your screen.
Let's look more closely at the right side now.
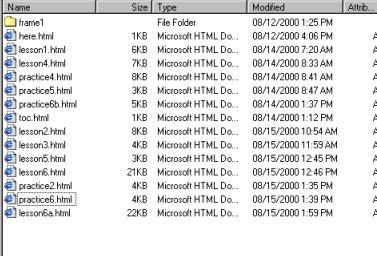
Here's a picture of one of the folders and some of the files which I used to create this tutorial:
You can see the names of the files, how big in KB's each one is, the type of file, and when it was created or modified, and its attributes. That's all I'm going to say about this section for now...just wanted to let your know what is there!
Part IV: Using Windows Explorer as a tool:
Let's look at the menu on the top of Windows Explorer.
That's a good place to begin to understand any program.
One of the first things I want you to do is to look at the Help option. Go ahead, click on Help. You should see two items...."Help Topics" and "About Windows ___". Make a note! Does it say Windows 95 or Windows 98? In future lessons you'll need to know. That's your operating system and there are differences between Windows 95 and Windows 98 so I may say something like: If you have Windows 95 go here or if you have Windows 98 go there. You need to know.
At the top of the Windows Explorer screen you will see the words: "File", "Edit", "View", "Tools", and "Help" on the Menu Bar
This is one of those differences.... Windows 98 also has "Favorites"
Click on "File" and you will find
"New",
"Create Shortcut",
"Delete",
"Rename",
"Properties",
"Close"
and a list of recently opened folders.Under "New" you will find
"Folder"
"Shortcut".If you add a file or a program to your computer you will want to put it in its own Folder. This is where you create a new folder. You'd go to File/New/Folder.
For example, let's say you are taking an English course in school. You can create a folder named English and then create separate folders inside it for Essays and Poetry or whatever.
If you want to create a shortcut, this is the command you would use. File/New/Shortcut. We haven't talked about shortcuts before. Shortcuts are icons which you can put on your desktop or on your taskbar or in your Start menu. They are pointers to the program they represent. They are useful for programs that you use all the time.
In the example given above, I found the WinWord.exe file, highlighted its name and went to File, New,Shortcut. Then I dragged the shortcut onto my start menu and onto my desktop. (This is demonstrated more fully in Lesson #8's Practice Session).
The other commands such as "delete", "rename", and "close" are clear enough. If you choose to delete a file or a folder (deleting a folder also deletes any files inside of the folder!), the material will be moved into the Recycle Bin. You can later empty the Recycle Bin to totally delete the file or, if you made a mistake, you can go retrieve it.
"Properties" will open a window and provide you with information about any folder. For example, my Winword file was created in 1999, is 13.8 MB big, and has 6 folders with 219 files.
So what? Well, if I never use WinWord and I want to add another program to my hard drive but I don't have enough room, I can delete WinWord and know that I will gain 13.8 MB. But that would be sacrilege!
The "Edit" option on your menu will open to give you these choices:
Undo,
Cut,
Copy,
Paste,
Invert Selection.We will get into these when we discuss moving and copying files in just a couple of minutes.
"View" is a huge subject.
You can change the way information is presented on your screen, a matter of personal preference. You can choose to view your toolbar at the top or not and your status bar on the bottom or not.There's a section where you can choose to view the information on the right of the screen as a list of files and folders or as icons and to view your icons as large or small. Try the various selections and see what you get and what would work best for you. (Before you "try" anything, make note of the current settings so that you can return things to the way they were before you changed anything!) You can also arrange your icons by date or by name, by size or by type from the View menu. Windows 98 users will find more information in Personalize Your Computer, Part V.Under "Tools" you will find Find/Files or Folders. If you know you have downloaded a picture off the internet or that you wrote an essay and named it "Re-ElectBush" but you don't remember what folder you put it into, you can do a search from here.
We've already done a couple of searches and here's how: When you click on Files or Folders, a window will open and you type in the name of the folder and tell the computer which drives to look in and the computer will come up with an answer such as "C:/Apps/Business/ElectBush.doc" so that you can find your essay.
Or to find out if you have Word for Windows you can enter the name "Word" and do a search. The computer will find WinWord or Word for Windows or PassWord or WordPerfect and anything else which contains the letters "word."
The "Help" screen was mentioned previously. You can find everything you ever wanted to know about Microsoft Windows* from the Help screens. There's a table of contents you can peruse through or you can use the Index or Search Tabs to enter words and find specific information. For example, say you have forgotten how to move a file to a diskette. You go to Help Index and type in "Move" and a list of subjects will be provided for you such as moving documents, moving icons, moving files, moving taskbars, etc.
Part V: Using Windows Explorer as a File Manager:
Windows Explorer is much more than a Table of Contents with options. It is a file manager. You can move and copy files, folders. You can cut information from one document and paste it into another.
You saw above how to create a folder. You go to the File option on the toolbar, you choose New and then Folder. BUT, before you create a folder, where do you want the folder to be? If you are working with a Folder called Tenth Grade and decide you want to create another folder called English which will be inside the Tenth Grade folder, you need to first highlight the Tenth Grade Folder....that is, single-click on it. A highlighted folder name will turn blue. Then when you create a new folder, it will be created inside the Tenth Grade Folder. You will see on the right hand side of the screen the bottom selection will be "New Folder". It will have the folder icon to its left and will be in blue with a blinking cursor. You can now go to New Folder and type in the new name of your folder. Just start typing and the words "New Folder" will be replaced by whatever you are typing.
But say for example that you mess up. Say you create the folder English in another folder, say in your sister's Sixth Grade folder. You don't have to delete it and start over. You can just move it. Here's a couple of ways how:
- On the right side of the screen, find the file or folder you want to move.
"English" Highlight it.- On the left side of the screen, find the place you want to move it to.
"Tenth Grade"- Drag the folder to its new place. To drag means to press and hold down the left mouse button with its pointer on the name of the folder you are moving. Move the mouse to the left until the name of the target folder is highlighted. Then release your left mouse button.
Here's another way:
- Find the folder English and highlight it.
- Go to the Edit option on your menu bar and select Cut.
- Go to your target folder "Tenth Grade" and highlight it
- Go to the Edit option of your menu bar and select Paste.
But what if your sister comes in and says that she wants the folder named English to stay in her folder....she needs one, too. Then, instead of Cut and Paste, you Copy and Paste.....that is, the folder will be copied and pasted into its new location at the same time.
Copy and Paste
- Highlight the file that you want to copy
- Go to the Edit option on your menu bar and select Copy.
- Go to your target folder
- Go to the Edit option and select Paste
Or, if you are dragging the file, hold down the CTRL key while you are dragging and the file will be copied. Whenever you drag a file from one location to another, if both locations are on the same drive, the file will be moved but if the locations are on different drives, the file will be copied. (That is, the original will still be where you found it and a copy of it will be in the new location.)
You can also move a part of a file from one place to another, as covered in Lesson #4.
Sooner or later, all of you will want to delete some of your files...things you have updated or don't use any more. If you look at the far right side of your Windows Explorer window, you'll see dates....those are the dates that these files were created or put on your computer. If you are not sure if you should delete something or not, DON'T. But if the program was installed on your computer in 1998 and the file has a date of 2000, probably it is a file you created and is not part of the files which are necessary to run that program. But let me repeat, if you're not sure...DON'T DELETE IT! Save it on a floppy disk until you are sure you don't need it.
See how much you have already learned! This chapter is huge and can be confusing but go over the information a few times and look at Windows Explorer on your own computer. You might even want to make some copies of your files to practice moving and saving and cutting and pasting. It would be wiser to play with a copy of something you have created which is not at all important. Don't experiment with files that are necessary for a program to run. In fact, I've created some files just for that purpose!
Click here to go there! You get two practice sessions with this lesson!
Well, actually, you don't. At the time we wrote this project, it was our intention to have it available on a CD-Rom. Therefore, all the instructions in practice session 6B call on the student to find certain files on the CD. Obviously, there's no CD involved at this time. Feel free to read the practice session. You may pick up some information.
Wow, have we covered some ground in this lesson!?! The next one will be easier, I promise. I hope you're enjoying this as much as I am!
End of Lesson 6.
Click here to return to table of contents.
*Windows* refers to Microsoft Windows 95® or Microsoft Windows 98®.